 1 / 6
1 / 6Wat heb je nodig?
Naast de geprinte onderdelen:
- 1×Vislijn
- naar wens×Vishaakjes
Beschrijving van de maker
Origineel in het EngelsFishing Rod “Sharky” — THE Perfect Beach Companion for Fishing Enthusiasts
-
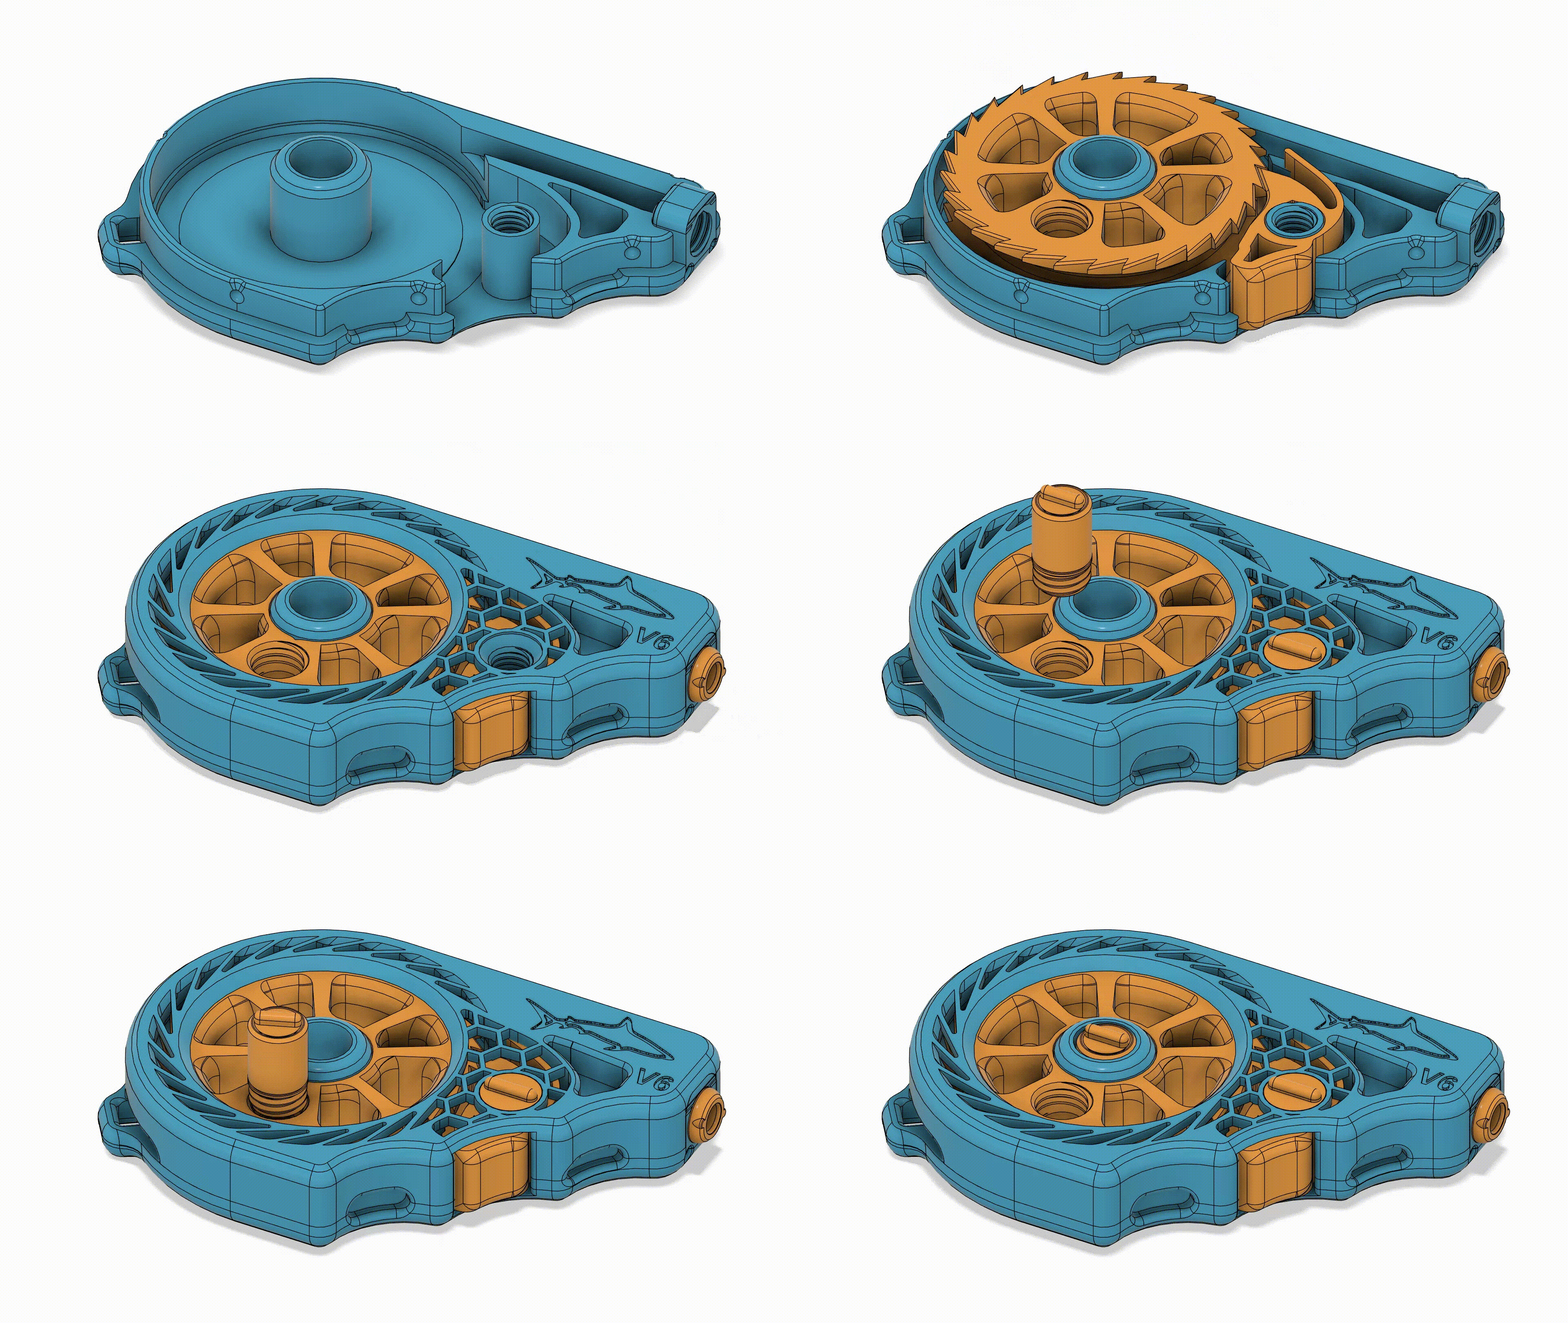
🖨 100% printable – no extra hardware required (except for fishing line and hooks of course)
-
⏱ Fast print – ready in around 2 hours
-
🧵 Material efficient – under 50 g of filament
-
🎣 Fully functional – thanks to two years of feedback with lots of improvements
-
🚀 Instantly ready – no tedious assembly every time you want to use it
-
📜 Detailed Documentation – printing instructions, assembly guide and tips & tricks ⬇
Sharky is a fully 3D-printable fishing rod designed to be the ultimate ultralight travel companion. Compact in your bag, fully capable in the water. Print, Pack, Catch!
You may also like my other Design: Fishing Rod - Grizzly - optimized for fishing from the riverbank or shore!
Boost Me❤ I put a lot of work into this design and continuously collect feedback for future improvements, so every bit of support is highly appreciated ❤
Impressions from the Comment section:


1. V6 - What's new?
-
Optional 6702ZZ Bearing Version
One of the most requested features over the past year was the addition of bearings. I didn’t expect Bambu Lab themselves to sell deep-groove ball bearings that fit perfectly into Sharky. This optional version uses 6702ZZ ball bearings for smoother rotation, less friction, and a noticeably nicer feel while reeling in your catch.
-
Rotating Handle
The second most requested feature was a rotating handle. Despite the very limited space I managed to integrate a fully print-in-place solution that rotates smoothly. No assembly required, no extra hardware, no supports. Read the Assembly Guide for more information!
-
Cable Tie Slots
The top side now includes two dedicated slots that let you thread cable ties through the body to attach the reel to a stick or similar object — instantly turning it into a proper fishing rod. Thanks to @PapaChez for this idea! See Assembly Guide for reference.
-
Additional Improvements
-
Reduced risk of tangling due to extra clearance inside the spool area
-
Forced recessed seam positions on rotating parts, improving mechanical movement even on less finely tuned printer setups.
-
Larger, rounded opening tabs for easier disassembly and a more comfortable grip.
-
Optimized internal clearance around the reel teeth, further improving smoothness of rotation.
-
Redesigned modifier for a stronger, more rigid back plate.
-
Larger attachment hole to better fit hand-wrist straps such as those from Bambu Lab (see also the parts list for reference).
-
Detailed and easy to read assembly guide
-
2. Printing Instructions
I highly recommend using the Prusaslicer files — all required settings and modifiers are already configured and tested.
I recommend printing this in PETG or PCTG, since they withstand outdoor exposure much better than PLA.
In case you want(need) to slice it yourself, here are some recommendations:
-
Set wall generator to “Arachne” or enable “detect thin walls” - otherwise the rotation mechanism of the handle might not work.
-
Set layer height to 0.2mm (dimensions are specifically designed for this layer height)
-
For screw, pin and tip increase the wall count to 8 and slow down outer wall speeds to ~40mm/s for clean threads.
-
load the bottom-body modifier into the part and set walls to 1, solid top- and bottom layers to 0, infill to 20% honeycomb and infill-perimeter overlap to 25%
3. Assembly Guide
⚠Please read the assembly guide carefully before use to ensure proper setup⚠
Only Bearing Version

Press two 6702ZZ Bearings into the wheel. Push in the bearings as far as possible. There should be a 3mm gap between the bearings and the surface of the reel afterwards.
Preparation — Clean up & Attach line
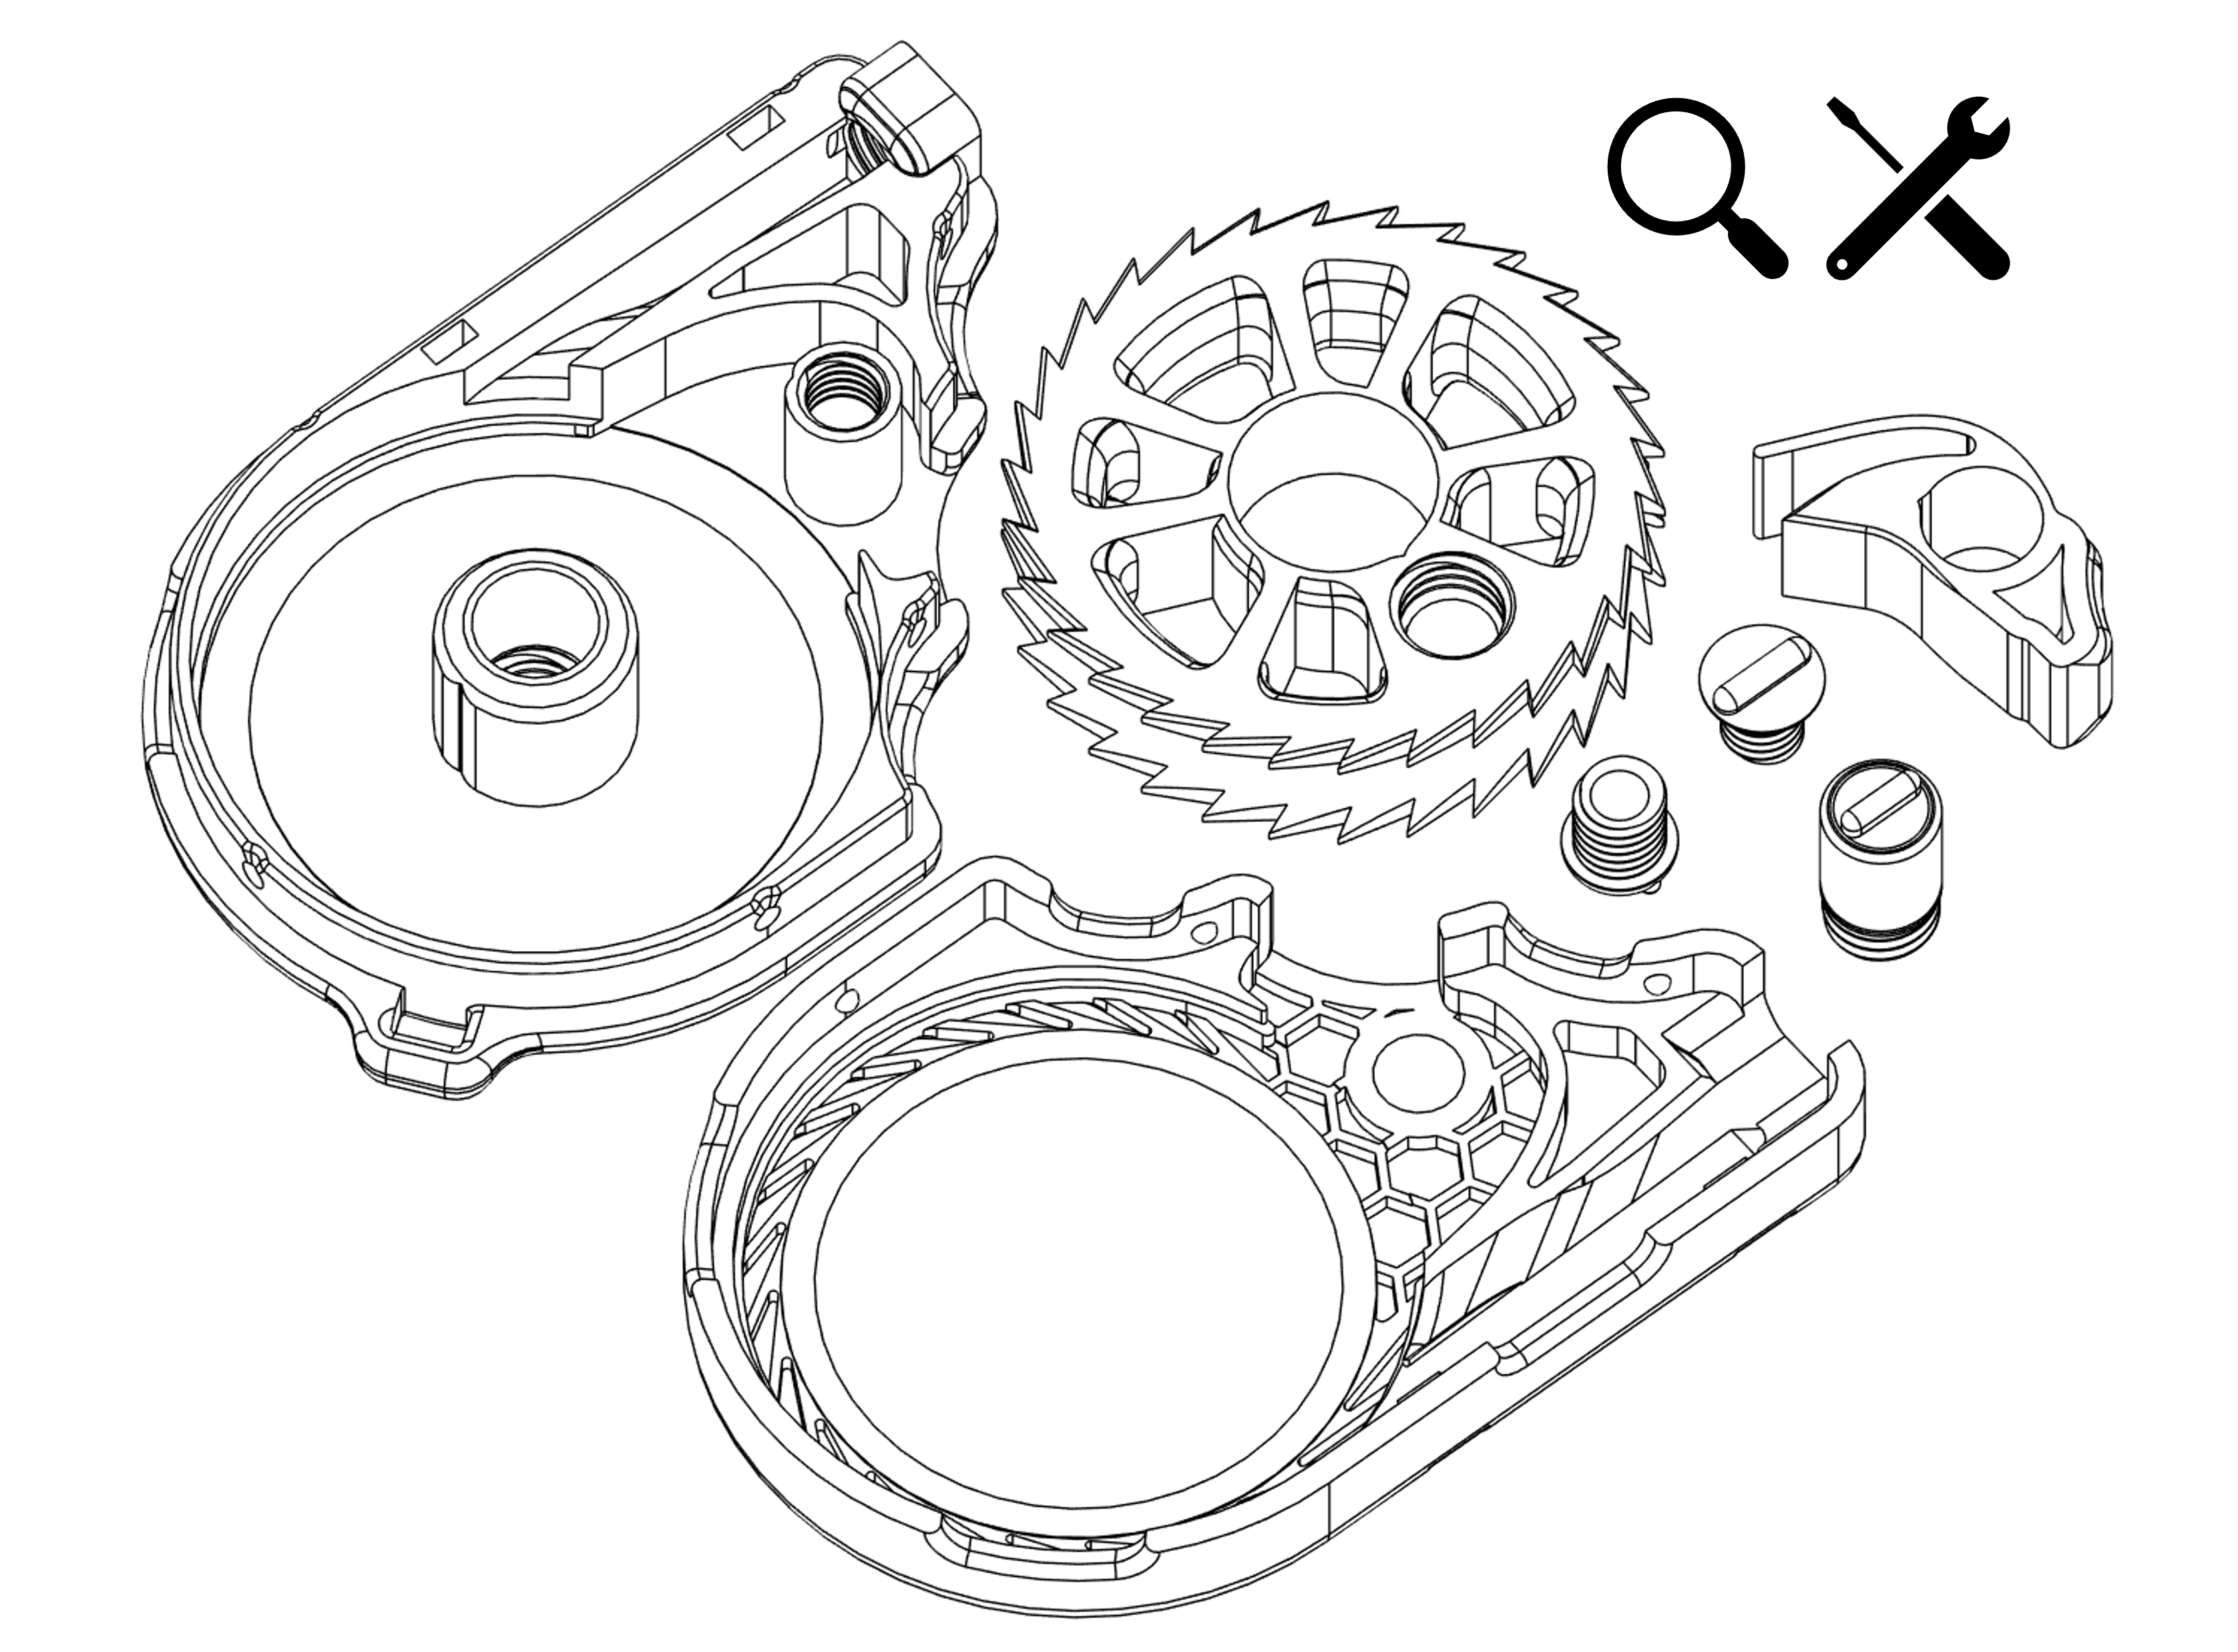
Inspect all parts for any debris left from printing. Clean up any imperfections using a sharp knife.
You can now already test whether the spool rotates freely in the bottom half of the housing. If resistance occurs, gently press on the spool while rotating it inside the housing. This will smooth minor surface imperfections caused by the printing process. Repeat this on both sides of the spool if necessary.
⚠Important:
Before continuing with the assembly, 5–50 m of fishing line should already be wound onto the spool.
Inside the spool there is a dedicated recess intended for tying the first section of line securely in place.
After you wound the line onto the spool, feed the loose end of the line through the front opening of the housing and temporarily secure it if necessary.
Step 1 — Insert the Spool

Begin assembly by inserting the spool.
Make sure that the threaded side faces upward — this is where the handle will later be attached.
Step 2 — Install the Lever
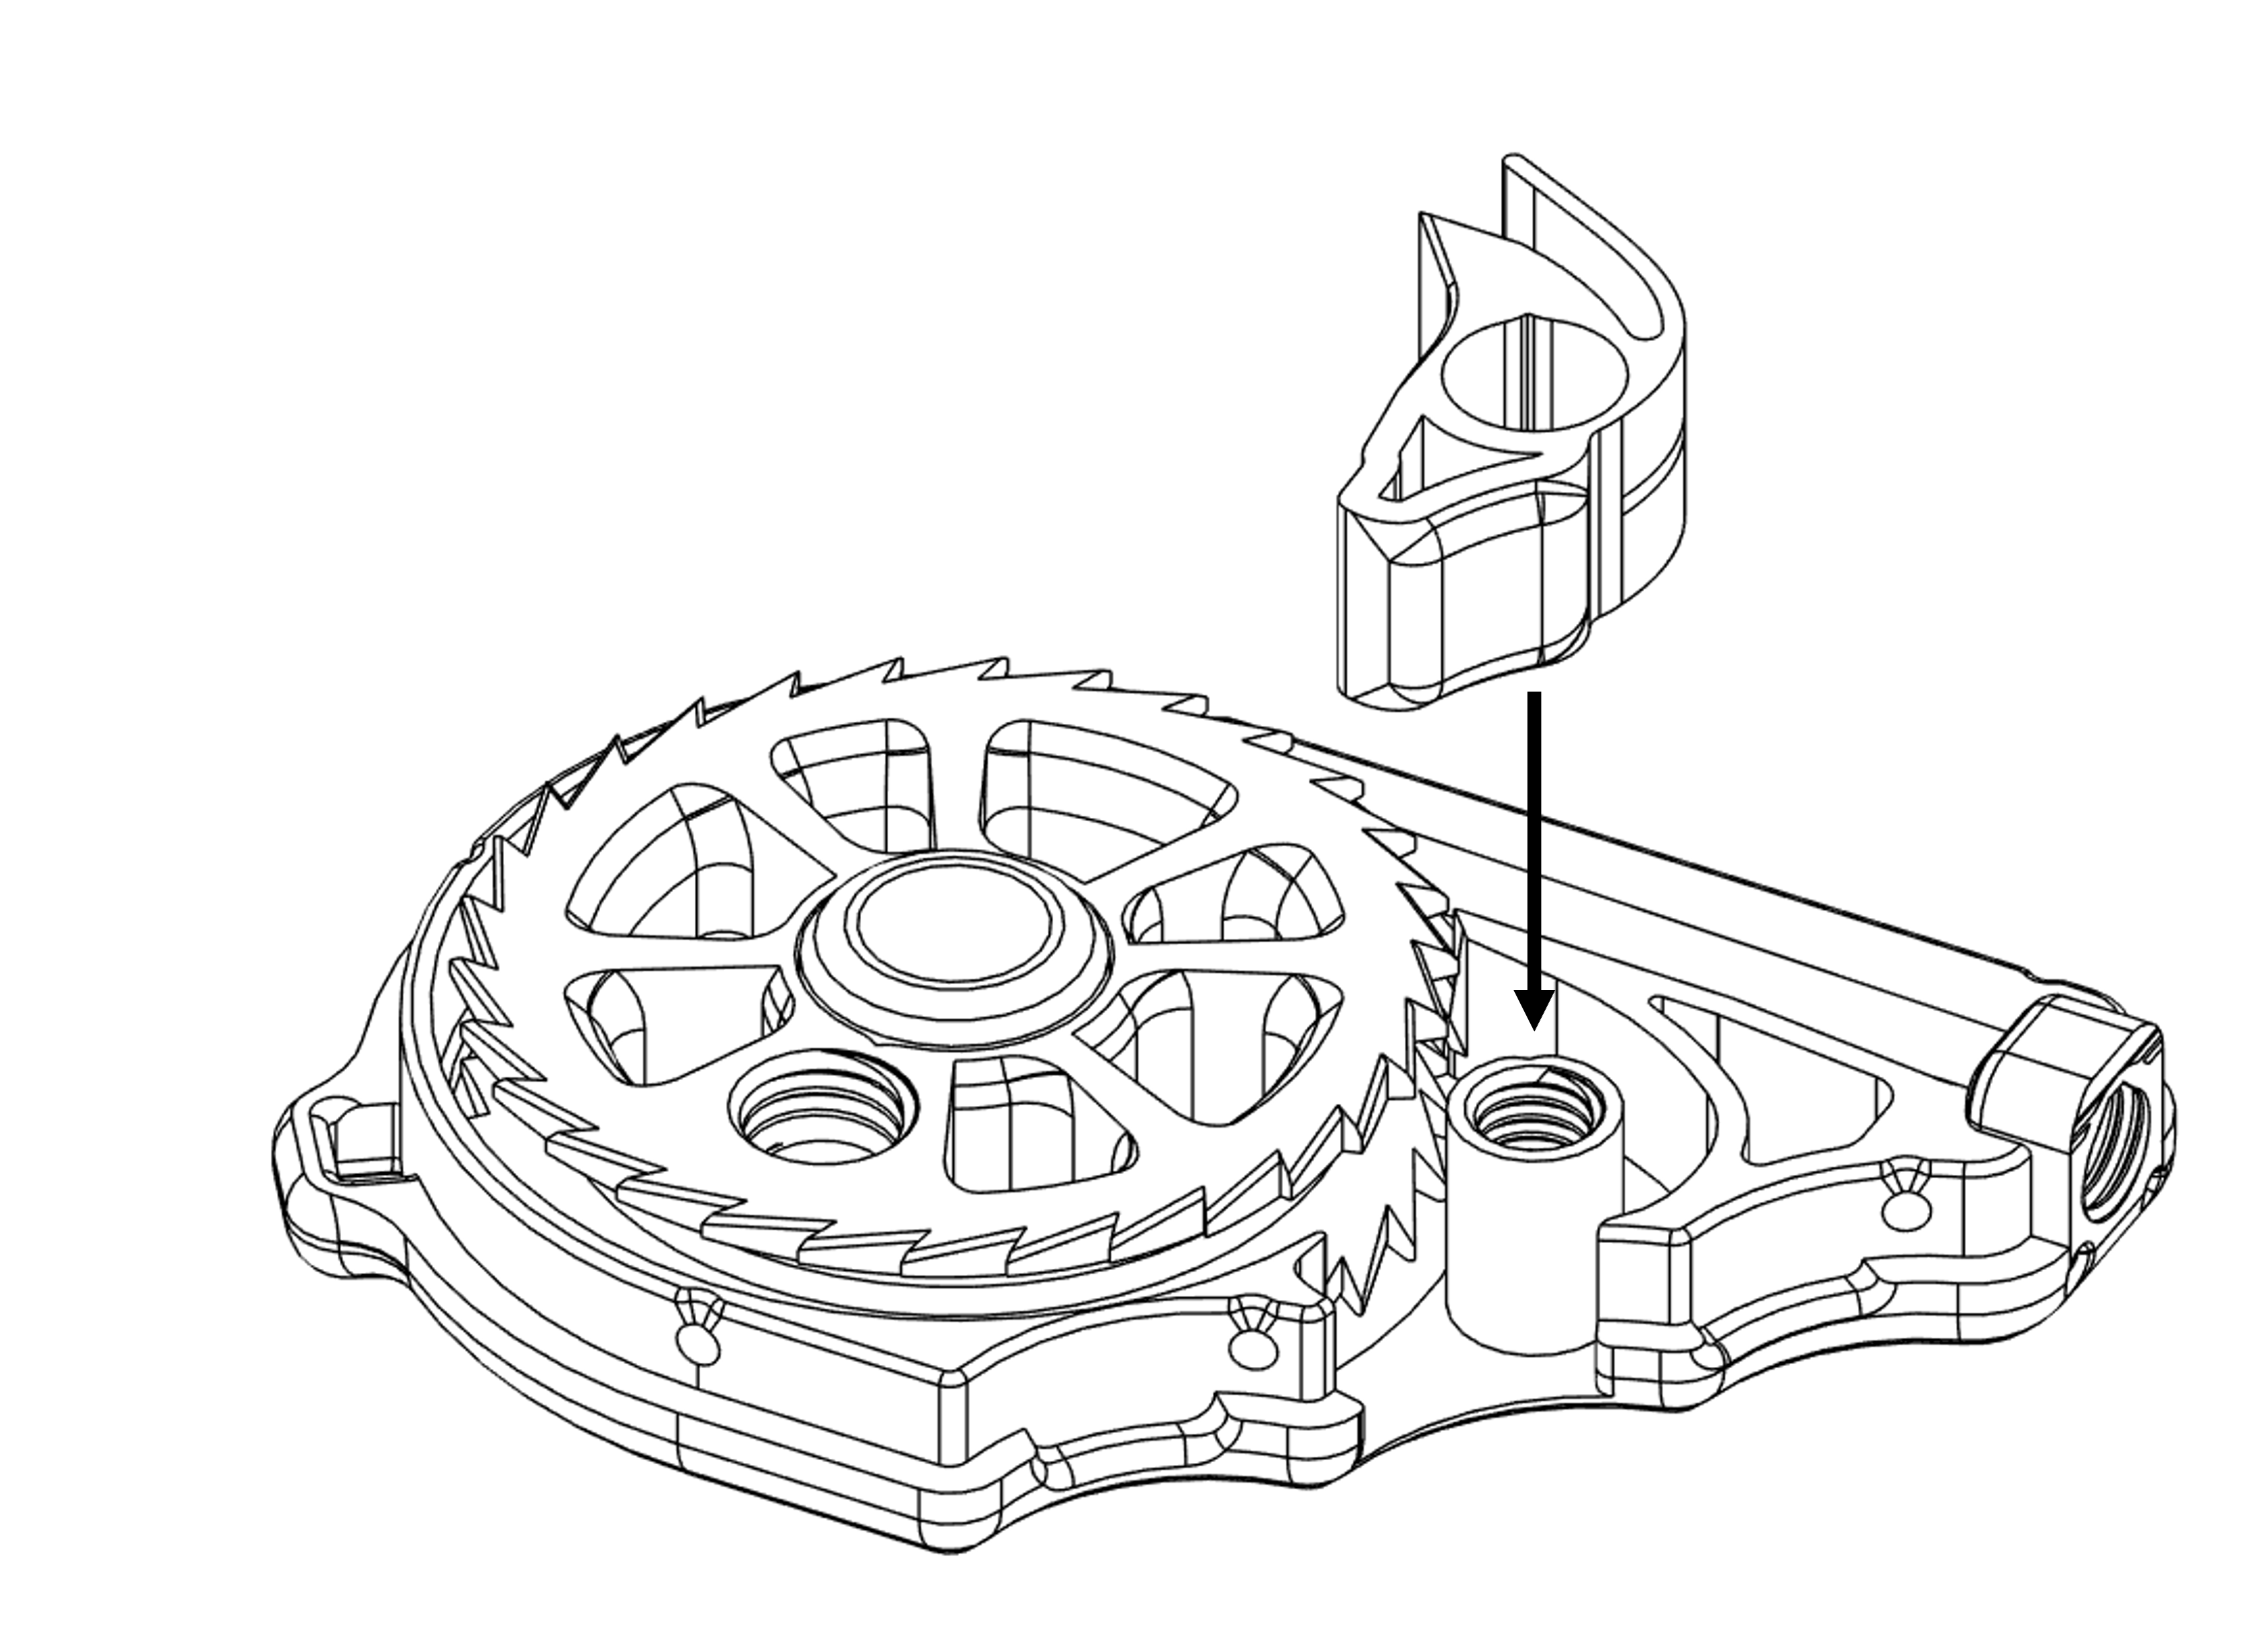
Insert the lever next.
The spring must be slightly compressed during installation, as it is designed to remain under constant tension.
Before continuing, verify that the lever moves freely on its axle without binding.
Step 3 — Closing the Housing

⚠Important:
Before clipping on the upper housing half, make sure the fishing line has already been routed through the front opening of the lower housing.
Now place the upper housing half onto the lower half.
Apply moderate pressure until the clip mechanism engages and both halves are firmly connected.
If a visible gap remains between the housing halves, open the housing again and check for filament residue or print imperfections along the clip mechanism. Remove any obstructions before closing it again.
Step 4 — Installing the Tip

⚠Important:
Before screwing in the tip, the end of the fishing line must be fed through it.
Screw the rod tip into the housing.
This area is subject to significant wear. It is therefore recommended to print and carry several spare tips. Very thin fishing line can gradually cut into the plastic and wear it down over time. Both the fishing line and the tip should be inspected regularly for wear and replaced if necessary!
Step 5 — Securing the Assembly
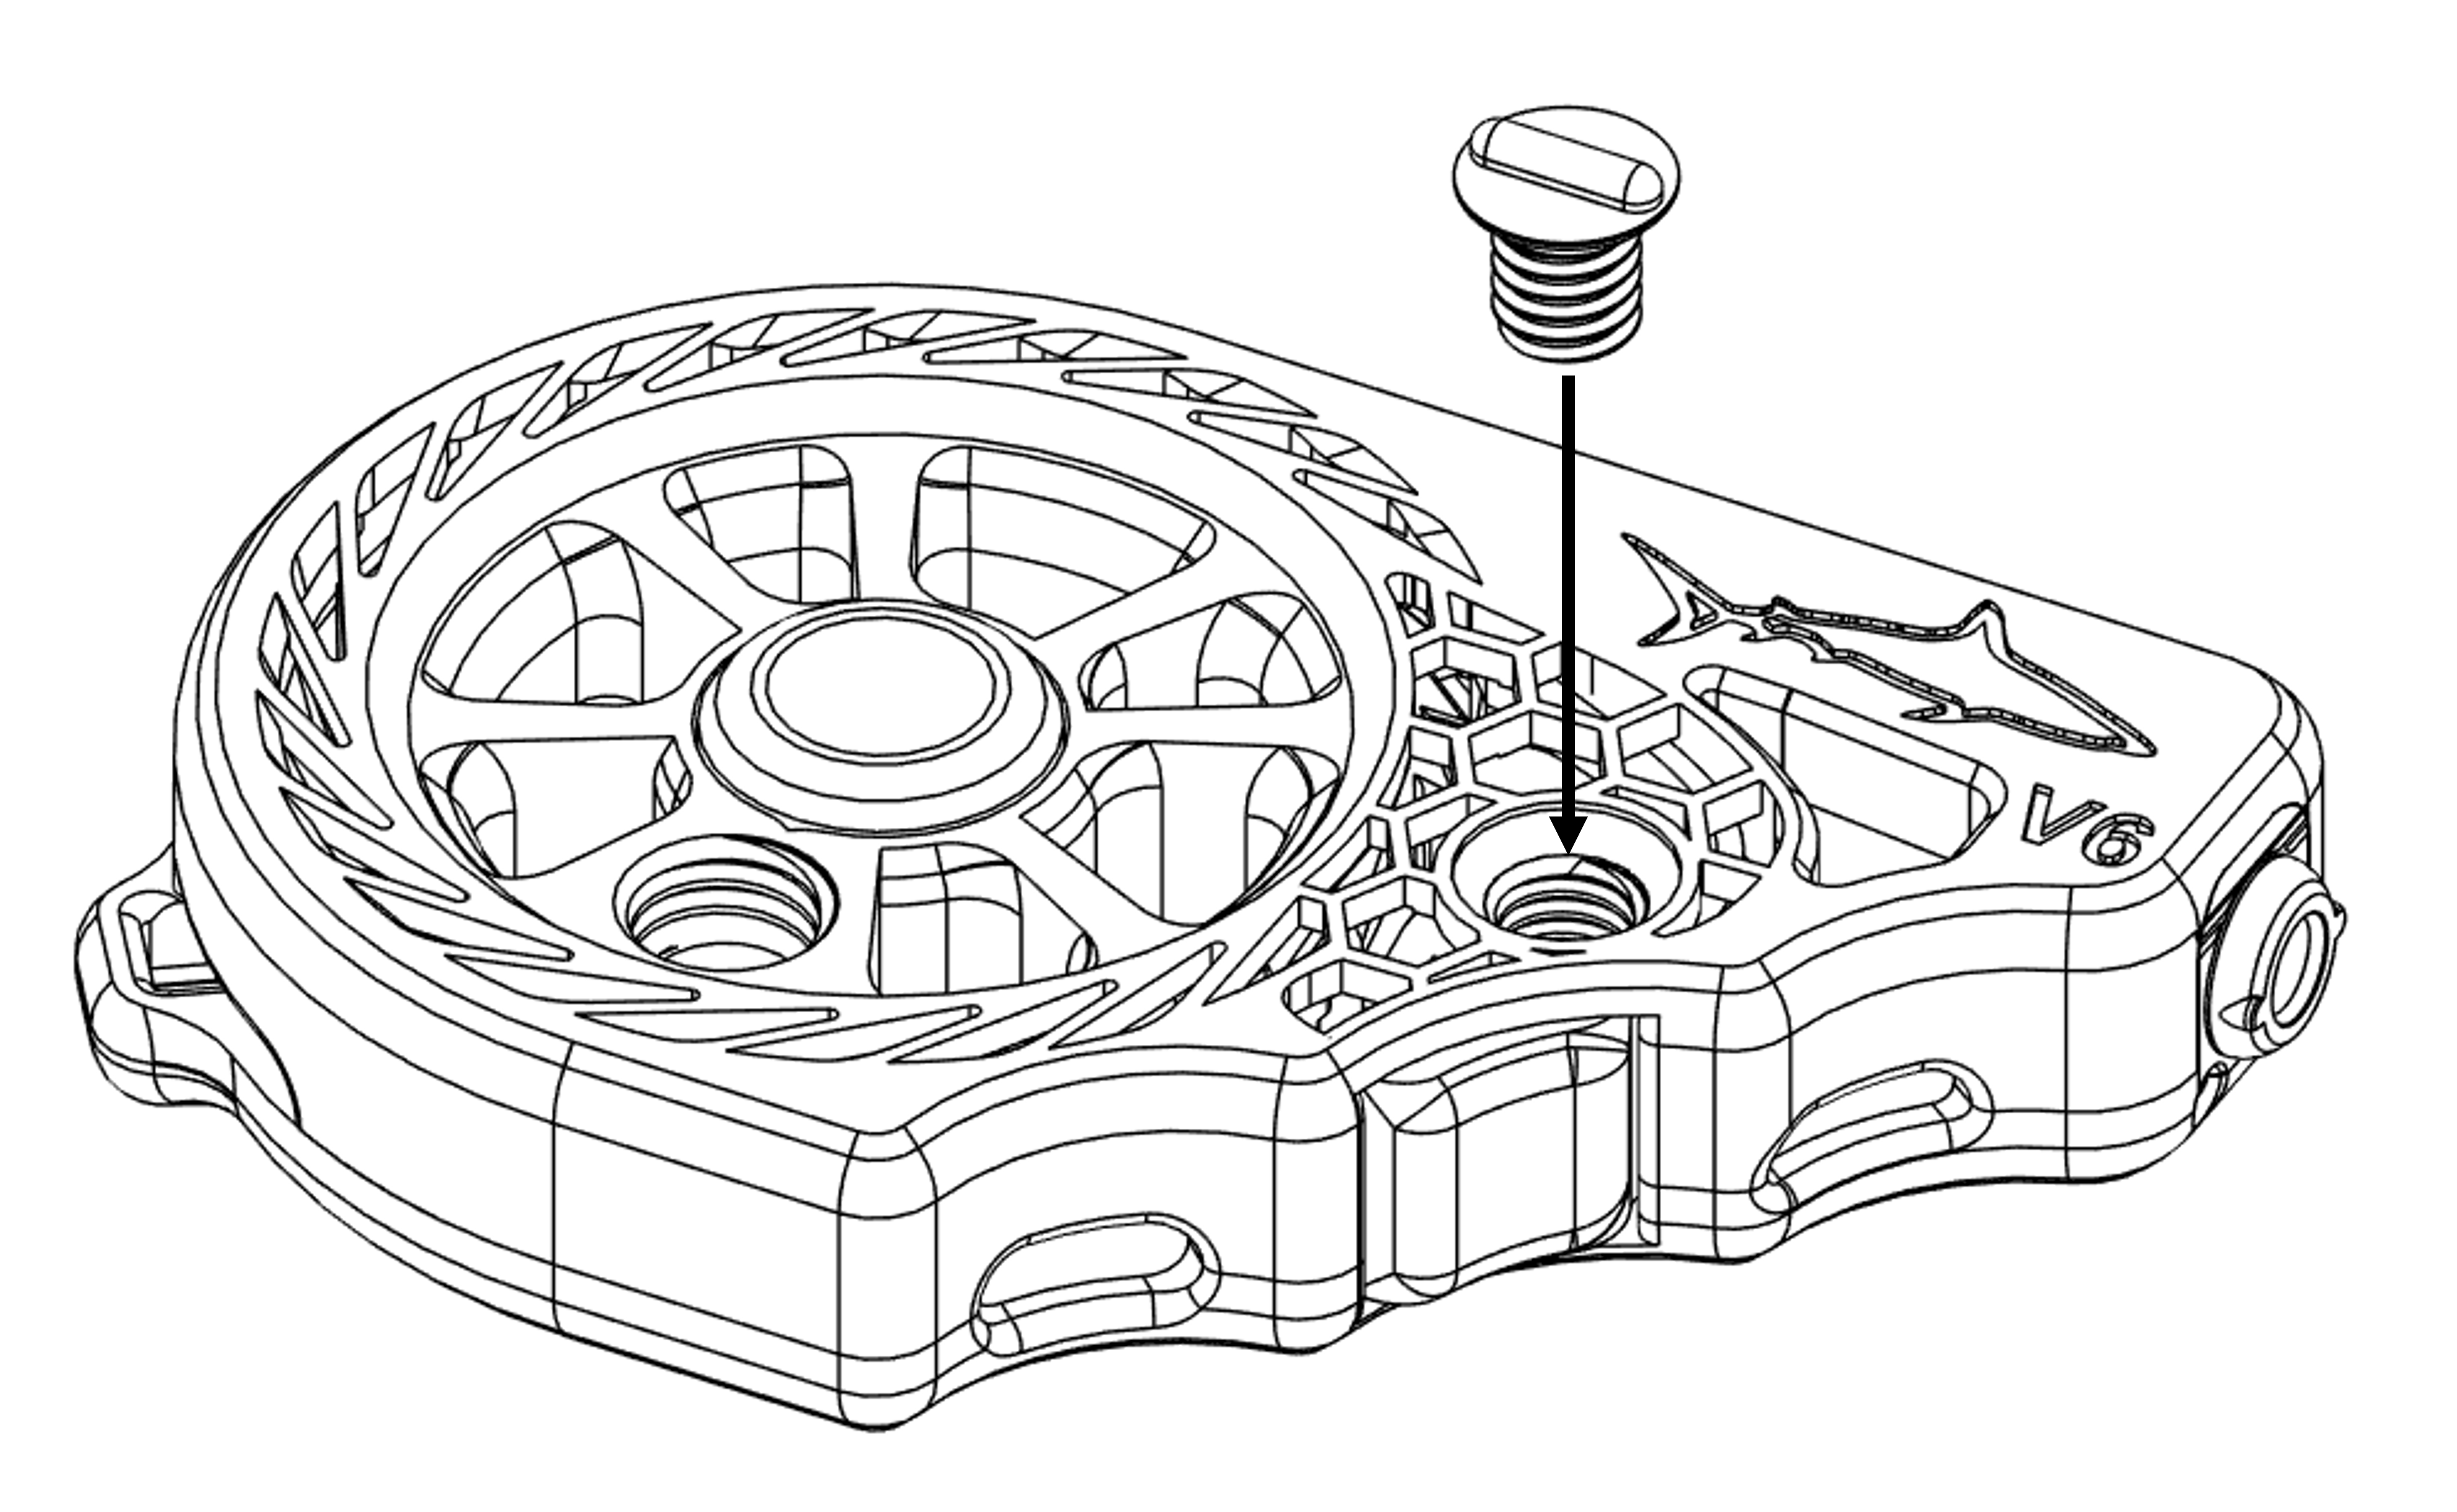
Now secure the assembly using the printed screw.
The screw does not need to be tightened firmly — it only serves to additionally secure the middle section of the housing.
⚠Important:
Do not forget to remove the screw before attempting to open the housing again.
(It is very easy to overlook — speaking from experience.)
Step 6 — Installing the Handle

⚠Important:
Do not force the handle into the thread. This may cause the thread to seize, making the handle impossible to remove later.
Make sure the threads printed cleanly and contain no plastic residue inside.
Now screw the handle into the spool.
If screwing in the handle is difficult, repeatedly screw it in a small amount and then unscrew it again. This gradually cleans and smooths the threads.
Step 8 — Activating the Handle

Once the handle has been fully screwed in, the rotation mechanism must be activated (if not happened already by screwing it in).
-
Gently move the handle in the X–Y-direction to weaken the connection between the outer and inner component.
-
Then try to rotate only the outer part clockwise until the connection breaks.
-
If it won’t come loose, carefully score the area just above the threads with a sharp scalpel/knife to release the connection.
You can further improve smoothness by applying gentle pressure and rotating back and forth to wear down minor surface irregularities.
Step 9 — Prepare for storage
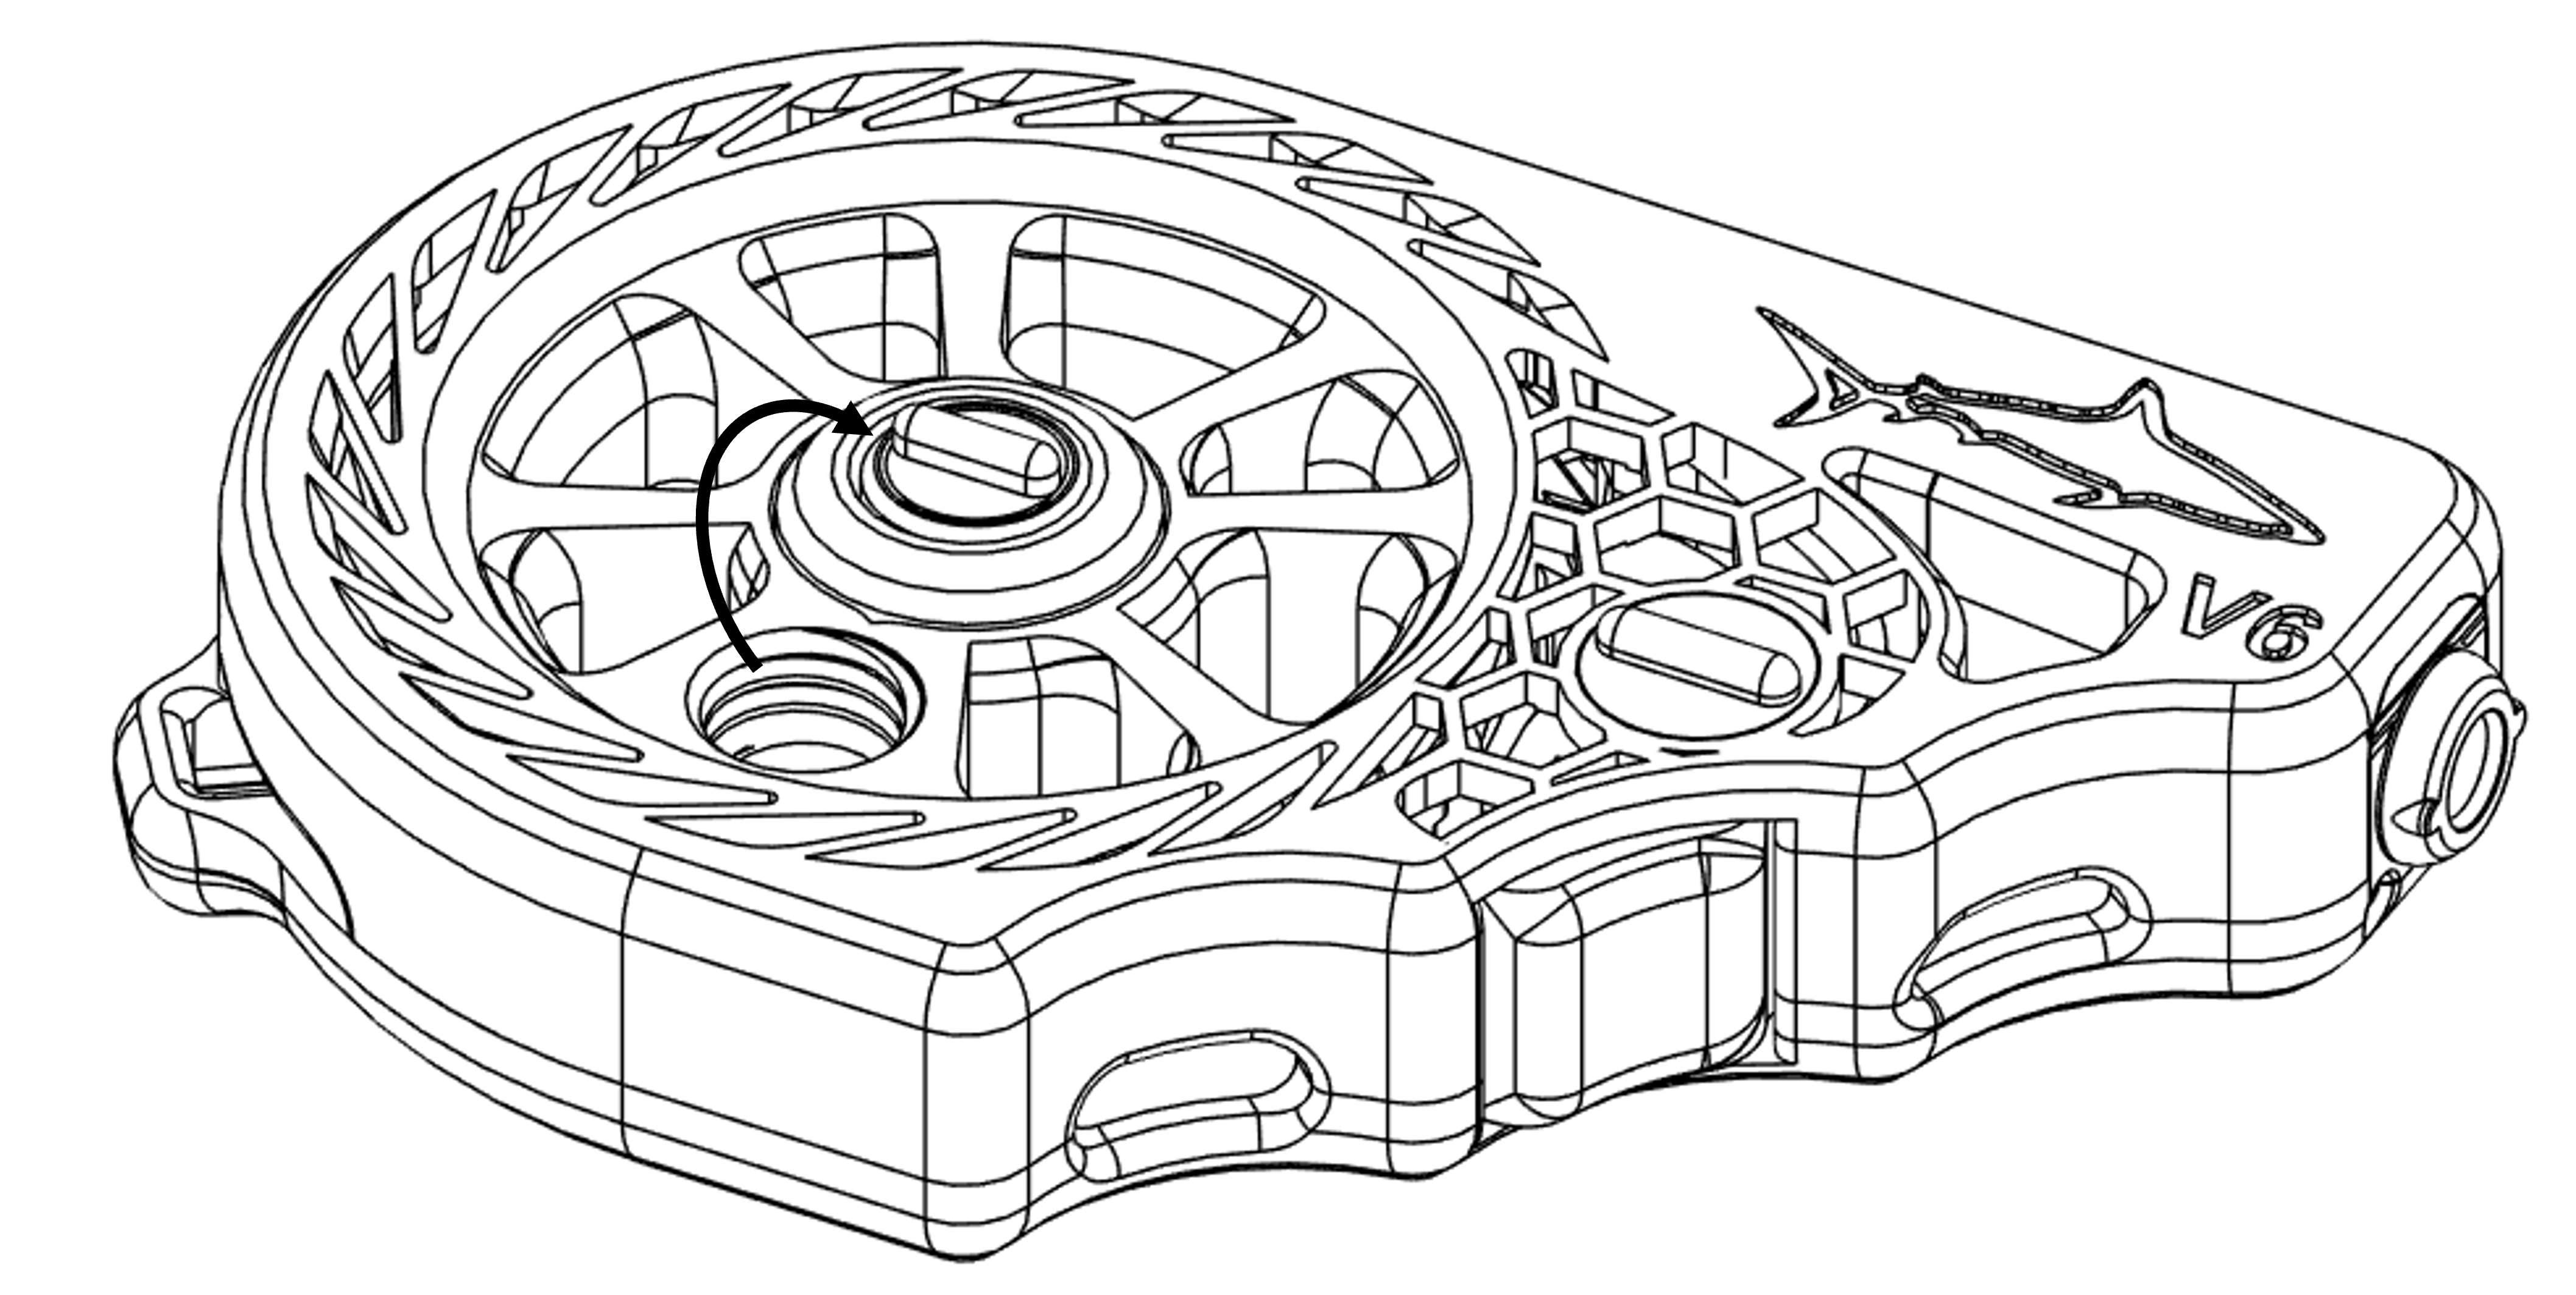
Assembly is complete — congratulations!
You can now attach a hook or other bait to the end of the fishing line.
To prevent accidents when device is stored away, the hook can be inserted into one of the front holes. Just apply slight tension to the line afterwards . The gear mechanism will prevent the hook from coming loose.
Now the handl
Geprint door de community
Bij de bron al 78 keer geprint. Laat hier als eerste zien hoe het bij jou werd.
Reacties 0
Ook handig in onderweg
meer zoals dit

Reiskoker voor tandenborstel met print-in-place scharnier
door codewarriorr


 Extern
Brillenhouder voor de zonneklep in de auto
door schuetzi99