1 / 6
1 / 6Wat heb je nodig?
Naast de geprinte onderdelen:
- 4×schroeven met pluggen, of klittenband/plakstrips
Beschrijving van de maker
Origineel in het Engelsv3: Added corrected brackets for mounting with velcro or command strips, if screw mounting to the wall is not an option. They should print properly now!
Get your CPAP off your nightstand! Get it on the level of the mattress, too, if your nightstand is short or tall…. Respiratory therapists recommend having your CPAP machine at body level!
- This model will hold your AirSense 10 machine on the wall, with enough space in the back for the power cored and the heated hose.
- I designed it to tuck as close as possible to the wall. If you are using a non-heated hose that does not have a 90 degree elbow, I am not sure if there will be enough clearance; there is approximately 48mm of clearance behind the hose port to the wall when mounted.
- It uses four screws to mount to the wall. If you don't want four screws, use the top two mounting holes, but I am not providing advice to guarantee structural stability.
Design
I found this CPAP Bedrail mount by DVs3D, which is a great model, but I don't need it hanging off my bed. :) However, the model features a very nice plate that holds the AirSense 10 very secure. Time to fire up the remix machine!
Now I needed some brackets to mount to the wall. I found these nice ones by Martin, and they were almost perfect. I used the 200mm version, which was a bit too long, so time to do some modifications.
I loaded all this into TinkerCAD (1337 modeler, here), and got to work. I needed to make the tabs that would connect to the mounting plate so they lined up. I also needed to shorten the brackets a bit. I think it turned out pretty nice!
Printing
I printed these using a .4mm nozzle at .2mm layer height, with four walls. I did turn on organic supports for the brackets so the holes would not sag during printing. It's probably not necessary, unless the cooling on your printer is less than optimal. I used M4 pan head bolts to mount the plate to the brackets. I recommend chasing the holes with a 4mm drill… I'm not a good modeler, so my tolerances may be off. Counterbore in the bolt holes is there do the bolt is recessed and the CPAP is held tightly by the mounting plate.
Remixing
If you want to modify further, here are the TinkerCad files:
Please share your models if you remix!
Geprint door de community
Bij de bron al 17 keer geprint. Laat hier als eerste zien hoe het bij jou werd.
Reacties 0
Ook handig in hulpmiddelen
meer zoals dit
 past op ResMed AirSense 11
 Extern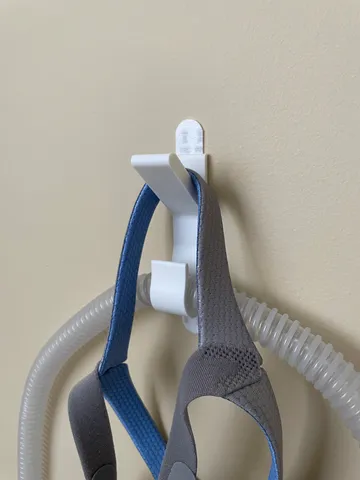

 past op ResMed ClimateLineAir 11