 1 / 2
1 / 2Wat heb je nodig?
Naast de geprinte onderdelen:
- 2×Wago 221-413 lasklem
- 2×M3x12 inbusbout
- 2×tiewrap (optioneel)
Beschrijving van de maker
Origineel in het EngelsDisclaimer: Be aware that in many jurisdictions, mains voltage installations must only be executed by qualified or even only certified individuals! This model description as well as the attached pictures are only for demonstration purposes. For installation instruction and wiring diagrams, consult Shelly's official documentation.

Additionally Required Hardware
Item
Quantity
WAGO 221-413 (3-conductor)
2
M3×12mm Socket Head Screws (DIN 912)
2
Optional: Zip Ties*
2
Cable, Plug and Socket
* I strongly suggest implementing some sort of strain relief. Use either zip ties or the provided strain relief ring. The latter can be fixed to the cable using super glue.
Compatible Devices
The following table includes devices that have been posted as Makes. This is not an exhaustive list; other devices may be compatible.
Gen3 Device
Tested by
FH
Gen4 Device
Tested by
Features
This case was developed to address common issues I found in existing designs, such as unnecessary bulk and excessive hardware requirements. The design incorporates several key features aimed at optimizing functionality and ease of assembly. Below is an overview of the primary design elements, including a clamp-based closure to minimize the need for metal fasteners, a wall-mounting clamp for straightforward installation, and provisions for LED and button accessibility—all while ensuring printability with careful attention to overhangs and bridges.
Closing Features
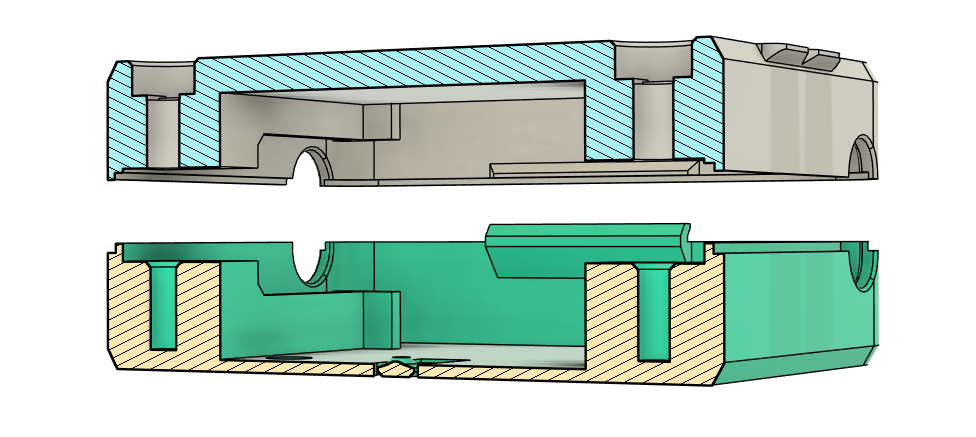
Compared to similar models, the closing mechanism of this design is reduced to the absolute minimum necessary. The top half is secured with just two screws and a latch on the opposing side. While other designs may use heat-set inserts—which indeed look impressive on 3D-printed parts—this model opts for 2.7 mm holes. This size provides sufficient grip for an M3 screw, allowing for direct installation without any pre-processing.
Wall Mounting Clamp
During testing, I quickly realized the need for a simple yet effective fixture—a clamp that securely holds the box in place at its final destination without complicating the installation process. The clamp can be easily attached to a wall using tape and grips onto the indexing features at the bottom of the housing.

To address the challenges of printing thin walled compliant structures, such as the springs on the clamp, the design has been optimized for vase mode. This allows the entire clamp to be printed as a continuous extrusion path, reducing the need for manual adjustments to seam positions. The model is designed for use with a 0.4 mm nozzle and corresponding line width.

Printability
The design of this model prioritizes ease of printing, with all overhangs angled at 50 degrees or more, which is generally considered a safe overhang in PrusaSlicer. For any areas with 0-degree overhangs, they are specifically designed to be easily bridged, ensuring a smooth printing process without the need for additional supports.

Compact Design
Through multiple design iterations, I have reduced the outer dimensions of this housing to an optimal size. The width is dictated by the space needed for two WAGO clamps and the Shelly PM Mini, along with the necessary walls in between. The height and depth have also been carefully minimized while ensuring all components fit securely.
Operability
For full operability, the design includes a thin section to allow LED visibility and a compliant segment that provides easy access to the button beneath.

Print Instructions
The compliant mechanism on the base will work best printed in PETG, but ABS or ASA will be fine as well. I advise against using PLA due to the potential heat generated by the PM Mini. PLA may soften, which is undesirable for a case containing mains voltage.
This model ist optimizes to be printed with a 0.4 mm nozzle. or the shell parts, you can use your default slicing profiles.
For the clamping bracket, I recommend using vase mode. Alternatively, if not using vase mode, place the seam in one of the bottom side corners to ensure a clean finish.

Assembly
Only attempt assembling this if you understand the risks involved with mains voltage!
For a detailed installation guide study Shelly's official documentation. My instructions here only cover the mechanical details.

Preparation
Given the limited space within the housing, precise wire lengths are crucial for a successful assembly. To simplify the process, I’ve outlined the necessary wire lengths below. You will need the cables for both the input and output connections, as well as an additional piece of blue wire to serve as the neutral line.
Length
Input Line
Output Line
Extra
Neutral (N)
66 mm
36 mm
70 mm*
Phase (L)
34 mm*
34 mm
-
Protective Earth (PE)
46 mm
76 mm
-
*cut ~2mm off of one of the ferrule to make it fit into the screw terminal on the PM Mini
For a secure connection, I recommend using ferrules on all wire ends. Note that the ferrules may need to be shortened slightly to fit properly into the terminals on the PM Mini. Also consider WAGOs guide on using ferrules with 221 connectors.
Installation: PM Mini
Once your wires are prepared, follow this installation order:
-
Connect the input and output phase lines to the PM Mini.
-
Connect the separate neutral line to the PM Mini.
-
Bend the short PE and N wires around their respective cable axes and secure them in the WAGO clamps.
-
Connect the PM Mini's neutral line to the corresponding WAGO clamp.
-
Connect the long PE and N wires.
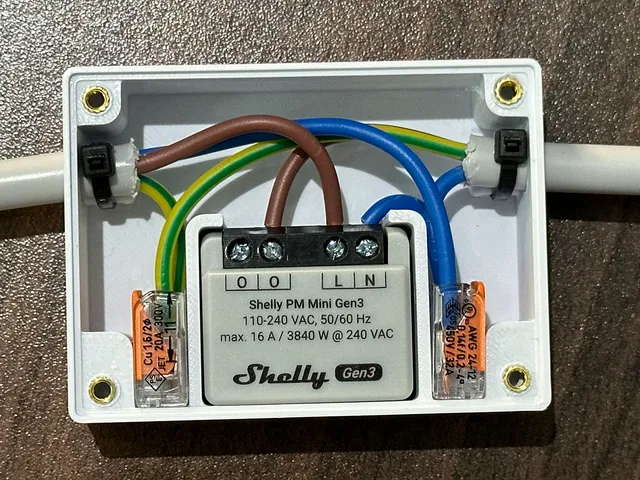
Finally, place the WAGO clamps into the bottom housing. While inserting the PM Mini, push the wires below the latch to ensure a secure fit.

Installation: 1PM Mini
DJ took the time to create a schematic diagram of the wiring for the 1PM Mini. Find it in the comment section. The installation is carried out in the same way as described above.
Remarks
I don't provide a clamp version with a screw hole because I think it's a bad idea to drill holes close to power outlets.
Alternativ Solutions
-
Shelly Plug S - If you have the space it's much easier to just buy the Shelly socket proxy piece, it does power metering as well and additionally let's you turn off the outlet.
-
Shelly 1 PM mini housing by Reedy The inspiration and original solution to the problem I tried solving here. I had some changes in mind that I wanted to implement so I developed my own versionShelly
-
Mini Smart extension cable housing (no Screws) by jju182 A similar approach that doesn't use any screws.
Geprint door de community
Bij de bron al 8 keer geprint. Laat hier als eerste zien hoe het bij jou werd.
Reacties 0
Ook handig in smart home
meer zoals dit
 past op Shelly Plus 1 / Dimmer 2
 past op Shelly Plus 1 / 1L / 2PM / 2.5 / Dimmer 2
Inline-behuizing voor Shelly met Wago 221-klemmen
door pjvenda

 past op Shelly Mini Gen 3
 past op Shelly Plus 1 / Plus 1PM / Plus 2PM
Snoerbehuizing voor Shelly Plus 1, 1PM en 2PM
door Reismann
 past op Shelly 1 / 1PM